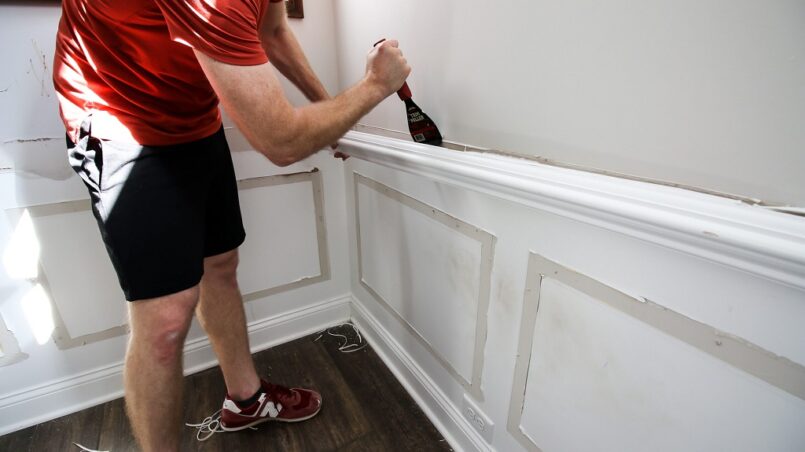
Are you looking to update your home decor or renovate a room? One of the first things that may come to mind is removing a chair rail. A chair rail typically consists of a horizontal strip of molding or trim along the middle of a wall, used to protect walls from furniture damage. Research reveals that chair rails originated in 17th century Europe and served as a functional element. However, over time, it can become outdated, making a room feel cramped. In this guide, we will provide step-by-step instructions on how to remove a chair rail without damaging your walls.
Tools you will need
Gather the following tools before you begin:
- A pry bar
- A hammer
- A utility knife
- Safety glasses
- Gloves
Make sure to have all these items handy before proceeding with the removal process.
Step-by-step instructions
- Turn off the power to the room: Before removing a chair rail, it is essential to turn off the power supply. This will prevent any accidents from occurring while working near electrical outlets or switches.
- Remove any electrical outlets or other objects attached to the chair rail: If there are any electrical outlets, light switches, or other objects attached to the chair rail, make sure to remove them before starting the removal process. This will make it easier to remove the chair rail and avoid any damage.
- Use a pry bar to gently loosen the chair rail: Start by placing the pry bar between the wall and the bottom of the chair rail. Gently push down on the bar while pulling it towards you. This will create a small gap between the wall and the chair rail.
- Tap the pry bar with a hammer: Once you have created a gap, use a hammer to tap the pry bar carefully. This will help loosen the chair rail from the wall gradually.
- Cut through any nails or screws: As you continue to pry and hammer, some nails or screws may become visible. Use a utility knife to cut through them to easily remove the chair rail.
- Be careful not to damage the wall: As you remove the chair rail, make sure to be gentle and avoid damaging the wall. If necessary, use a putty knife to help pry off any stubborn sections of the chair rail without causing any damage.
- Patch any holes and paint the wall: After removing the chair rail, you may observe some holes or marks on the wall. Use a spackling compound to fill in the holes and sand it down once dry. You can then paint over the patched areas to match the rest of your wall.
Example: If the wall is painted, use a roller to apply an even coat of paint over the patched areas. If the wall has wallpaper, you might need to carefully remove and replace the sections where the chair rail was attached.
Safety Tips
Removing a chair rail may seem like a simple task, but it still requires caution. Here are some safety tips to keep in mind while removing a chair rail:
- Be careful when using the pry bar as it can slip and cause injury.
- Wear safety glasses to protect your eyes from any flying debris.
- Wear gloves to protect your hands from cuts or scrapes.
- If you are unsure about how to remove a chair rail, it is always best to consult a professional.
Additional tips
- If the chair rail is heavy, it may be helpful to have someone assist you in removing it.
- Be careful not to drop the chair rail as it can break and cause injury.
- When reinstalling the chair rail, make sure to use the correct hardware for secure installation.
By following these tips, you can safely and easily remove a chair rail without causing any damage to your walls or yourself.
FAQs
Can I remove a chair rail by myself?
Yes, it is possible to remove a chair rail on your own with the right tools and caution. However, if you are unsure or uncomfortable with the process, it is always best to consult a professional.
Will removing a chair rail damage my walls?
While there is always a possibility of some minor damage to the wall, following the correct removal process can minimize any potential damage.
How long does it take to remove a chair rail?
The time it takes to remove a chair rail will depend on the size and complexity of your room. However, the average removal process takes about 1-2 hours.
Can I reuse the chair rail after removing it?
We do not recommend reusing a removed chair rail in most cases. The nails and screws used in installation may cause damage or affect the stability of the chair rail.
Do I need any special tools for removing a chair rail?
Most households commonly have the tools needed to remove a chair rail. However, it is essential to have safety glasses and gloves to protect yourself during the process.
Conclusion
With the right tools and precautions, you can easily remove a chair rail, making it less daunting. Remember to turn off the power supply and remove any attachments before starting, use caution when handling tools, and be gentle when removing the chair rail to avoid damaging your walls. With these instructions, you can update your home decor or renovate a room without any hassle. Overall, removing a chair rail is a simple and effective way to give your walls a fresh look. Get started and transform your space now!


