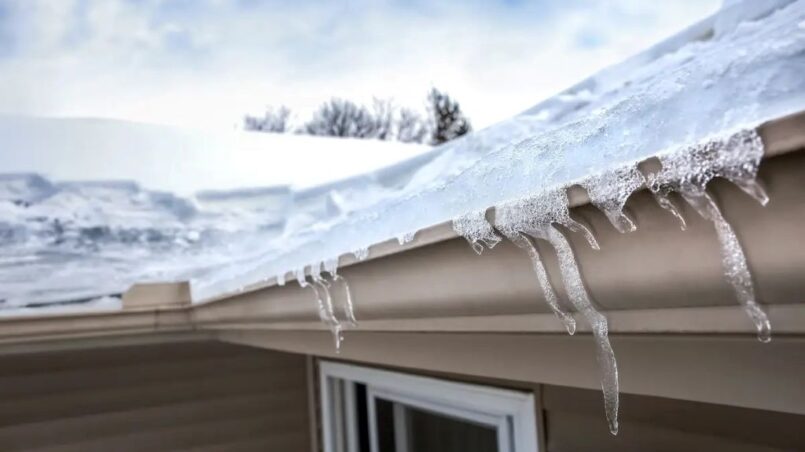
Winter can be harsh on your home’s gutters. As snow accumulates on the roof and temperatures fluctuate, it can lead to ice dams – buildups of ice that prevent melting snow from draining properly through the gutters. Left unchecked, ice dams allow water to pool and back up under shingles, leading to leaks, rot, mold, and other expensive home repairs.
Luckily, you can remove ice dams and prevent their return with the right tools and techniques. This guide will walk you through how to remove ice dams from gutters, and tips to stop them from reforming on your roof.
What Causes Ice Dams?
Several factors can contribute to ice dam formation:
Temperature Differences
The biggest culprit is a temperature difference between your roof and gutters. When snow on the roof’s surface melts during the day, the water dries and refreezes at night when temperatures drop. Over time, these layers of ice build up into a dam.
This often happens when heat escapes through the attic, warming the roof. Meanwhile, overhangs and gutters remain cold, creating prime areas for refreezing. Poor insulation, leaky ductwork, and excess heat from appliances can all contribute to imbalanced temperatures.
Read Also: HOW TO EASILY INSTALL A TOILET SEAT?
Proper attic ventilation allows cold air to flow in and warm air to escape, preventing heat buildup on the underside of the roof. Blocked or inadequate vents cause temperatures to rise in the attic, leading to snowmelt and ice dam formation.
Roof Design
Steeper roofs allow snow and ice to slough off more easily. On shallow-sloped or flat roofs, melting snow lingers longer, increasing the potential for freezing and ice damming. Valleys, dormers, and other structures that interrupt the roofline also encourage damming. Dark shingle colors absorb more heat, further contributing to snow melting.
Dangers of Ice Dams
While ice dams may seem like just a wintertime nuisance, they can cause severe and expensive damage if left unchecked:
- Roof Leaks: When an ice dam blocks melting snow from draining, the water backs up under shingles and flashes. This water can leak into the attic, ceilings, walls, and electrical fixtures.
- Rot & Mold: Leaks caused by ice dams allow moisture into places it doesn’t belong. This moisture fosters mold growth and mildew and rots in wood roof beams, sheathing, drywall, and insulation.
- Structural Damage: Over time, unchecked leaks can severely compromise roof integrity. Water damage weakens structural wood components and even drips onto load-bearing walls, compromising their strength.
- Household Hazards: Ice dams place added weight on gutters and fascia boards. Eventually, they may pull away from the home completely. Icicles hanging from roof edges are also a falling hazard.
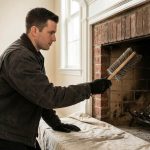
Preventing ice dams through proper roof maintenance is the best strategy. However, removing existing ice dams quickly is crucial to avoid expensive repairs from water damage.
Temporary Ice Dam Fixes
Several temporary methods can provide quick relief for ice damming:
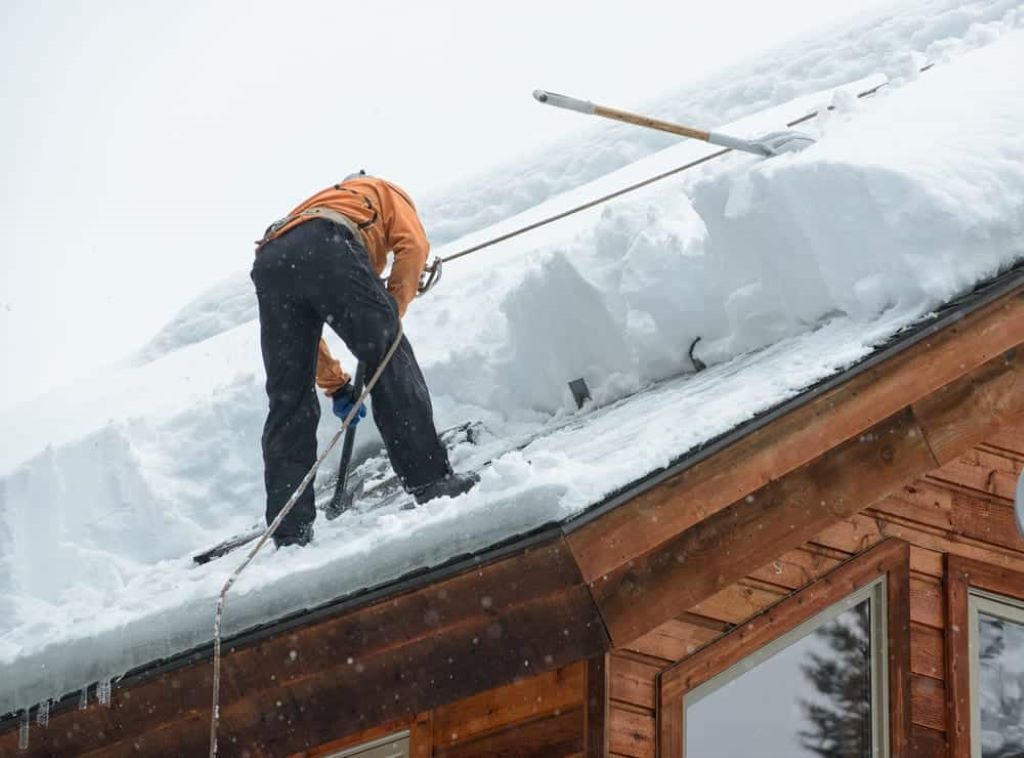
Remove Overhanging Snow
Use a roof rake to pull snow off overhangs and valleys where ice dams form. This eliminates some of the snowmelt that contributes to damming. Exercise extreme caution when working on ladders or the roof.
Make Channels Through the Ice
Create paths for water drainage by hacking channels through the ice dam using an axe or unique ice-cutting tool. Again, exercise caution on ladders and roofs.
Salt the Ice
Pour rock salt along the ice dam’s lower edge, make holes, and insert salt in an old sock. This helps melt channels in the ice. Use calcium chloride pellets – they work at lower temperatures than regular salt.
Heat the Gutter
Hold a heat gun or hair dryer against problem areas to loosen the ice’s grip. Take care not to damage roofing materials with excessive heat.
Install Heating Cables
Heating cables (heat tape) run along the roof edge and gutters, delivering low-level heat to prevent ice adhesion. They provide only a temporary fix but are helpful in a pinch.
These temporary solutions open drainage channels through existing ice dams. But often, ice continues forming in cycles, requiring vigilant monitoring. Addressing root causes is critical to preventing recurrent ice dams.
Removing Established Ice Dams
Once an ice dam has formed, removing it requires patience and persistence. Start by trying these methods:
Chip It Away
Use an ice chipper tool to break up the ice dam and open drainage channels along its lower edge. Wear protective goggles and watch for falling chunks of ice. Chip gently to avoid roof damage.
Knock It Down
After chipping channels, pound on the ice dam with a rubber mallet to break it up further. This helps dislodge the dam altogether. Again, exercise care not to dent or crack shingles.
Flush It Out
Follow chipping and pounding by spraying hot water along the ice dam’s lower edge. Use a hose-end nozzle attachment for the safest roof access. The flowing water washes away broken ice chunks. Continue flushing until water runs freely.
Cut Away the Ice
Use an electric chainsaw to cut into and remove the ice for thick or stubborn ice dams. The first score is along the dam’s lower edge. Then, make gradual cuts into the dam, flushing debris away until you reach the roof.
These methods remove established ice dams through chipping, pounding, melting, and cutting. Regularly clearing snow from overhangs and treating problem areas can help reduce recurrence. However, preventing ongoing ice dam issues requires addressing their root causes.
Preventing Ice Dams for Good
Ice dams don’t have to be an annual headache. With some roof maintenance and airflow improvements, you can stop them for good:
Improve Attic Insulation
Adding insulation creates a consistent temperature from your attic to the roof. This prevents snow from melting on the roof’s underside. Increase insulation to at least R-38 and ensure attic hatches are well-sealed.
Increase Attic Ventilation
Proper airflow is critical to preventing attic heat buildup. Evaluate existing vents – they should equal one sq ft of ventilation for every 300 sq ft of attic space. Add more vents or install a ridge vent for optimal circulation.
Install Radiant Barriers
Radiant barriers or insulation wraps work like sunscreen for your roof, reflecting heat to keep shingles cooler. Less heat reaching the roof means less melting snow. Add them directly beneath roof sheathing or across rafters.
Direct Heat Away from the Roof
Ensure bath and kitchen exhaust fans vent outside (not into the attic space). Seal ductwork and use baffles to prevent airflow over the attic floor. Relocate heat sources like recessed lights away from the attic.
Improve Roof Ventilation
Ventilated channels along the roofline allow air circulation, preventing heat and moisture buildup right under the roof. Specialty roofing products like breathable underlayment promote airflow.
Evaluate Gutters & Downspouts
Keep gutters clean and free of debris that blocks drainage. Use gutters with built-in heating cables. Ensure downspouts direct water well away from the home’s foundation.
Remove Dark Roofing Shingles
Dark shingles absorb heat, exacerbating snow melting on sunny days. Over time, replace them with lighter roofing materials that reflect sunlight and stay more relaxed.
Proper attic insulation, increased ventilation, radiant barriers, and roofing improvements make your home inhospitable to ice dams. But even with preventative steps, some icing is inevitable after heavy snow or extreme temperature swings. Monitor at-risk areas and act quickly to remove ice before major damming occurs. You can outsmart ice dams for good with diligent prevention and prompt removal.
Frequently Asked Questions
1. Is it safe to remove ice dams myself?
Removing ice dams requires working at heights, on ladders, and walking on icy roofs. These present serious safety hazards if proper precautions aren’t taken. Use sturdy ladders secured to the roof, wear slip-resistant footwear with good traction, and always keep a firm grip. Leave exceptionally high or complex roofs to qualified professionals.
2. How can I tell if I have ice dams?
Signs of ice dam formation include thick sheets of ice along roof edges or valleys, water stains on interior ceilings or walls, and snow remaining on the roof long after fresh snow has melted. Pushing up on shingles with an extendable pole can reveal concealed pockets of water if damming exists.
3. What temperature is needed to melt ice dams?
Ice begins melting at 32°F, but removing established dams takes sustained heat well above freezing. Aim for at least 180°F to soften and remove ice effectively.
4. Will salt damage my roof?
Calcium chloride salt pellets are safe for most roofing types. Standard rock salt can potentially corrode metal flashing – check manufacturer guidelines. Use either salt sparingly and scrub away residues when finished. Avoid scattering salt across your entire roof.
5. Are ice dams covered by homeowners insurance?
Most standard policies cover interior water damage caused by ice dams and related roof leaks. However, claims from recurring ice dams may prompt inspections and require prevention steps. Preventative ice removal isn’t covered, nor is damage to gutters or exterior materials. Contact your insurer for policy specifics.
Conclusion
Regular ice dam formation results from consistent factors like poor insulation, inadequate ventilation, and roof configuration. Identifying and addressing these root causes through proper roof maintenance and airflow improvements provides the best prevention. But even well-maintained roofs can experience occasional ice dams after heavy snow or extreme temperature swings.
Knowing how to safely remove ice dams through chipping, melting, flushing, and cutting allows you to take quick action when needed. Stopping ice before major damming preserves your roof, prevents leaks, and protects your home from severe water damage. You can outsmart ice dams for good with diligent prevention habits and prompt removal tactics.