To install a toilet seat, align it with the bowl, then secure it with bolts and nuts. Now, let’s take a step-by-step approach.
Whether replacing an old seat or installing a new one, this guide will walk you through the simple process. By following these instructions, you’ll have a sturdy and comfortable toilet seat installed in no time. Let’s start with gathering the necessary tools and equipment before moving on to the installation process.
With the right tools and a little know-how, you can quickly complete this task without professional help. Keep reading for a detailed guide on correctly installing a toilet seat.
Gather The Necessary Tools
Having the necessary tools at hand will make installing a new toilet seat much smoother. Before you begin, you should ensure you have everything you need to complete the job efficiently. This requires checking the seat package and gathering the necessary tools for the installation. For a comprehensive list of required tools and detailed instructions, consider visiting https://beebuze.com/, where you can find additional resources to assist you in this task.
Check The Seat Package
Inspect the contents of the toilet seat package for any specific tools or instructions that are included. This may consist of special wrenches or hardware unique to your purchased seat. Ensure you have everything provided to avoid delays during the installation process.
Collect Basic Tools
Gather the tools commonly required for toilet seat installation. These tools typically include a screwdriver, adjustable wrench, and pliers. Additionally, you may need a measuring tape and a level to ensure the seat is installed straight and securely. If you’re addressing issues like toilet seat paint coming off, having these tools ready can also help in assessing and fixing any related problems. Make sure each tool is in good working condition before starting the installation to ensure a smooth and efficient process.
Remove The Old Toilet Seat
The first step when installing a new toilet seat is to remove the old one. This process involves locating the hinge tabs, unscrewing the nuts, and lifting off the old seat. Let’s go through each step in detail.
Locate The Hinge Tabs
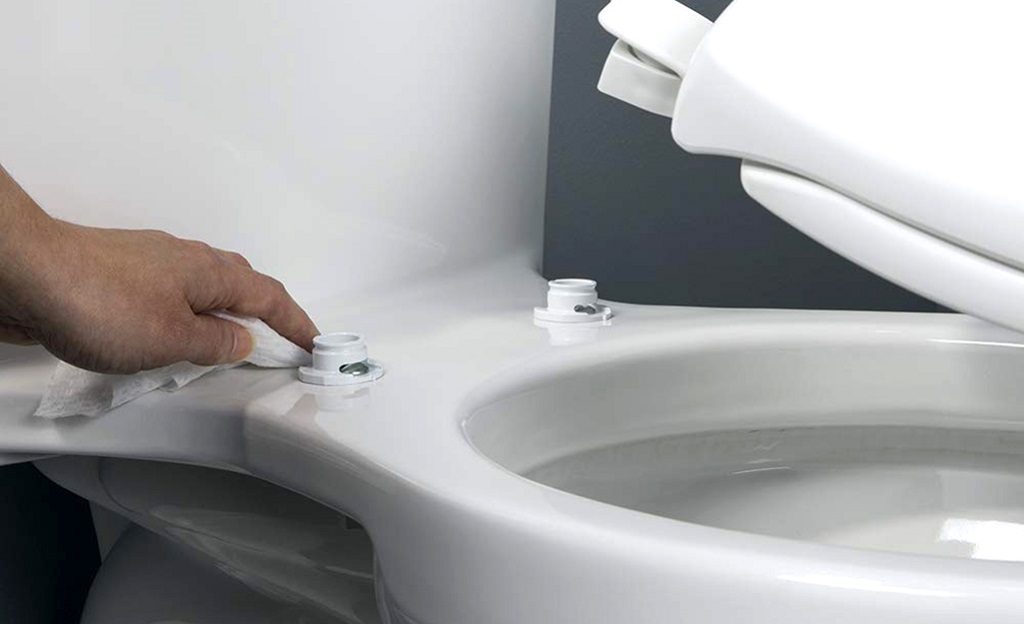
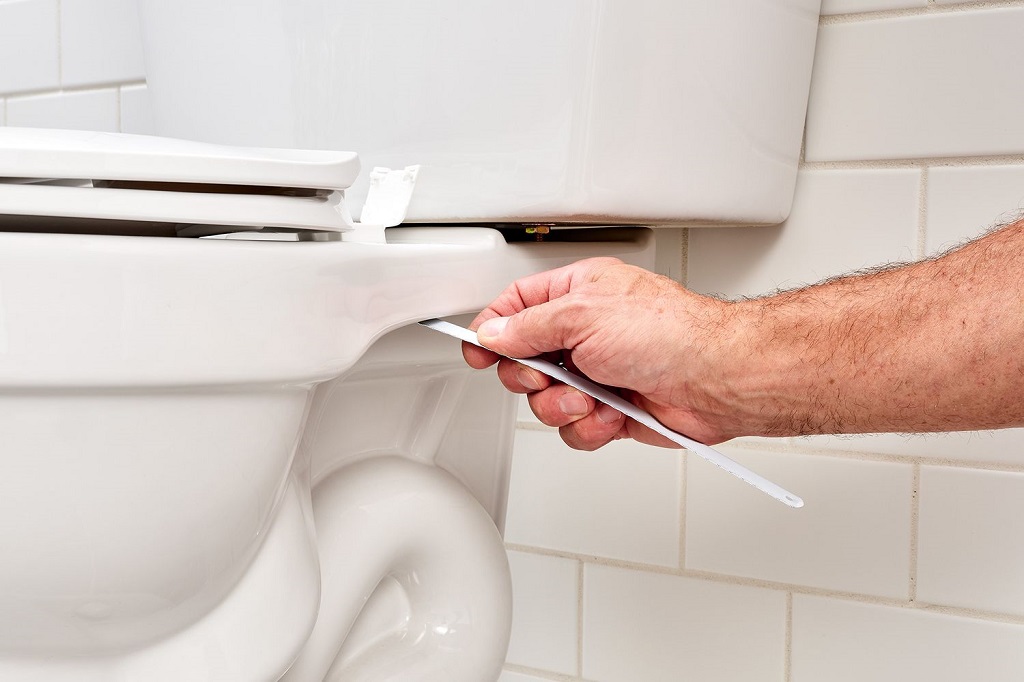
Underneath the old toilet seat are hinge tabs that attach it to the bowl. These tabs are usually found near the tank at the back of the chair. Small protective caps often cover them. Use your fingers or a flathead screwdriver to remove these caps and reveal the hinge tabs carefully.
Unscrew The Nuts
Once the hinge tabs are exposed, you’ll notice that nuts secure the seat to the bolts on the bowl. Use a screwdriver or a wrench to turn these nuts counterclockwise and loosen them. Keep turning until the nuts are completely removed from the bolts.
Lift Off The Old Seat
With the nuts removed, you can now lift the old toilet seat off the bowl. Hold onto the seat and carefully maneuver it off the bolts to avoid accidental damage to the toilet or surrounding area.
Prepare The Toilet Bowl
Installing a new toilet seat is a simple maintenance task that can give your bathroom a fresh look and improve comfort. Before you start, it’s essential to prepare the toilet bowl for the installation process. Follow these steps to ensure a smooth and successful installation.
Clean The Surface
Begin by thoroughly cleaning the surface of the toilet bowl where the seat will be attached. This step is crucial to promoting proper adhesion and preventing bacteria or dirt from accumulating under the seat. Use a disinfectant cleaner and a cloth or sponge to remove residue or grime. Take extra care to clean all crevices and the area around the bolt holes.
Inspect The Toilet Bowl
Next, inspect the toilet bowl for any damages or cracks. Look for signs of wear and tear that may affect the installation or the seat’s stability. Addressing issues before installing is essential to ensure a solid and secure attachment. Consider consulting a professional or replacing the entire toilet if you notice any cracks or damages.
Check The Bolts
Once the surface is clean and the toilet bowl is in good condition, it’s time to check the bolts. These bolts secure the toilet seat to the bowl, so it is essential to ensure they are tight and in good shape. Gently twist each bolt to ensure it is snug and not loose if any bolts are missing or damaged, purchasing new ones before installation is recommended.
Install The New Toilet Seat
Installing a new toilet seat may seem daunting, but with the proper guidance, it can be a straightforward and satisfying DIY project. This section will walk you through installing a new toilet seat, ensuring a secure and comfortable fit for years to come.
Place The Seat On The Bowl
With the old toilet seat removed, it is time to place the new one on the bowl. Start by positioning the seat on top of the elongated or round bowl, ensuring that the hinge holes align with the mounting holes on the bowl.
Align The Seat
Once the seat is in place, please take a moment to align it properly for a flush and seamless appearance. Ensure that the front of the seat is parallel to the front of the bowl. This alignment will enhance the aesthetics and provide optimal sitting comfort.
Attach The Nuts And Bolts
With the seat adequately aligned, it’s time to attach the nuts and bolts to secure it. Start by inserting the plastic bolts through the mounting holes on the bowl, ensuring they fit snugly. Then, attach the bolts with the provided nuts, tightening them with an adjustable wrench or screwdriver. Ensure not to overtighten, as this can cause damage to the seat or bowl.
Once the nuts and bolts are securely fastened, give the seat a gentle tug to ensure it doesn’t shift or wobble. If everything feels stable, congratulations, you have successfully installed your new toilet seat! Take a moment to admire your handiwork, knowing that you have not only improved the functionality of your bathroom but also added a stylish touch to your toilet.
Secure And Test The Seat
To install a toilet seat securely, remove the old seat and clean the area. Then, align the new seat and tighten the bolts. Finally, test the seat for stability and make any necessary adjustments.
Tighten The Nuts
To ensure the toilet seat is securely fastened, tighten the nuts that connect the seat to the bolts. Use a wrench or a screwdriver to tighten the nuts, ensuring they are snug but not overly tight. This will help to prevent the seat from shifting or loosening over time. It’s important to remember not to overtighten the nuts, as this could cause damage to the toilet or the seat itself.
Check For Stability
After tightening the nuts, it’s crucial to check the stability of the toilet seat. Please give it a gentle shake to see any movement or wobbling. If the seat feels loose or unstable, you may need to readjust the nuts or reinstall the seat entirely. Another way to check for stability is by sitting on the chair and shifting your weight from side to side. If you notice any movement or rocking, it’s a sign that the seat is not securely installed. This could lead to discomfort and potential damage to the toilet bowl.
Sit And Test The Seat
The final step in securing and testing the toilet seat is to sit on it and try its comfort and stability. Lower the seat gently and sit down, ensuring you feel secure and supported. Wiggle around slightly to see if the seat remains stable and doesn’t shift or move. Testing the seat before using it regularly will ensure that it is properly installed and prevent any unexpected issues or accidents in the future.
By following these simple steps, you can securely install a toilet seat and ensure its stability for long-term use. Tightening the nuts, checking for stability, and testing the seat will provide peace of mind and ensure a comfortable and safe experience in your bathroom.
Frequently Asked Questions On How To Install A Toilet Seat
How Do I Choose The Right Toilet Seat?
Choosing a suitable toilet seat involves considering shape, size, material, and color. Measure your toilet bowl, determine if you need a round or elongated seat, and decide on a material that suits your preferences and budget.
What Tools Do I Need To Install A Toilet Seat?
You will typically need a screwdriver, adjustable wrench, and pliers to install a toilet seat. Some seats may come with specific tools for installation, so be sure to check the package. Refer to the manufacturer’s instructions for any additional tools required.
How Do I Remove An Old Toilet Seat?
Locate the plastic or metal caps at the back of the seat hinge to remove an old toilet seat. Pry these caps open gently with a flathead screwdriver. Use a screwdriver to loosen the screws holding the seat in place.
Lift the seat straight up to remove it from the toilet bowl.
How Do I Measure My Toilet For A New Seat?
To measure your toilet for a new seat, measure the distance between the two mounting bolts on the toilet bowl. This will determine the seat’s width. Next, measure the length of the toilet bowl from the center of the mounting bolts to the front edge.
This will determine the seat’s length.
Conclusion
Installing a toilet seat is simple; anyone can accomplish it with a few essential tools. Follow the step-by-step instructions in this blog post to complete this task. Embark on a hassle-free journey to unclog your pipes with ‘Drain Snake: The Ultimate Guide to Unclogging Your Pipes.’ Remember to gather all the necessary materials and take proper safety precautions for a smooth and efficient plumbing experience..
With patience and careful attention to detail, you will have a perfectly installed toilet seat in no time. Happy DIYing!