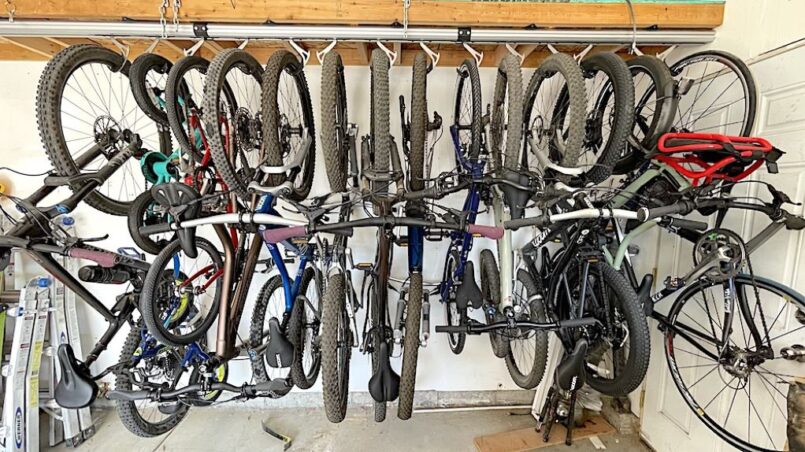
Having a wall mounted bike rack is one of the most efficient and space-saving ways to store your bikes in the garage. But with so many options to choose from, how do you select the right one? This comprehensive guide will walk you through all the key factors to consider when choosing a wall mounted bike rack for garage.
Types of Wall Mounted Bike Racks
The first decision to make is which type of wall mounted bike rack to get. There are three main types:
1. Basic Hook Rack
This is the most affordable and straightforward option. A basic hook bike rack simply screws into the wall and provides a curved hook for hanging the bike by its top tube or frame.
Pros:
- Inexpensive
- Easy to install
Cons:
- Less secure – bikes can swing and bump into each other
- No protection for bike frames
2. Horizontal Bike Shelf Rack
As the name suggests, this rack provides a horizontal shelf for resting the bike frame on. The bikes sit flat against the wall for a compact storage solution.
Pros:
- Keeps bikes firmly in place
- Protects bike frames from swinging and bumping
Cons:
- More expensive
- Bulkier protrusion from the wall
3. Vertical Bike Rack
A vertical bike rack holds the bike upright by gripping both wheels. This allows for maximum space efficiency, with the smallest protrusion from the wall.
Pros:
- Extremely space efficient
- Secure hold keeps bikes firmly in place
Cons:
- Most expensive option
- Not all bike frames fit easily
Important Features to Look For
Beyond just the style, there are some key features that make one wall mount bike rack superior over another. Here’s what to look for:
Materials
Search for racks made from sturdy steel or aluminum rather than cheaper plastics. Metal materials will be stronger and last longer.
Weight Capacity
Check what total weight capacity the rack is designed to handle. Most hold 2-3 bikes, but make sure it can support your bike types – especially if you have heavy electric bikes.
Mounting Hardware
Quality racks will include mounting hardware for attaching the rack to studs or solid blocking in the wall. Toggle bolts should be provided for drywall mounting.
Protective Padding
Padding on the bike contact points protects your bike’s frame from scratches and damage. Rubber or vinyl coatings are ideal.
Locking Mechanism
Some racks feature a built-in locking mechanism or retention arms to firmly hold each bike in place on the rack. This prevents jostling and theft.
Adjustability
Look for a rack that offers adjustable hooks, arms or shelves so you can accommodate different bike frames and wheel sizes.
Measure Your Garage Space
Before shopping for a specific rack, take some measurements of your garage space so you can choose the right size:
- Verify stud placement – you’ll need to anchor into studs for maximum weight support.
- Measure wall length – account for any doors, windows or cabinets when measuring.
- Measure ceiling height – ensure there’s ample overhead room for lifting bikes on and off the rack.
- Account for protrusion – measure how far out from the wall the racks extend so they don’t obstruct doors or vehicles.
- Consider ground space – some racks have a stabilizer bar that touches the floor for extra security. Leave room for this.
Measuring the exact area where you plan to install the rack will allow you to choose the right size that fits your space.
Pick a Secure Mounting Location
When selecting the spot to mount your new bike rack, there are a few factors to consider:
- Mount at eye level for easy access to hanging and removing bikes.
- Install away from garage doors – avoid locations where bikes could get bumped or knocked off the rack.
- Choose a central, visible location to deter theft and damage.
- Attach into wood studs or solid blocking for maximum weight capacity. Toggle bolts work for drywall attachment.
- Ensure there’s room to walk and open vehicle doors without interfering with the rack.
- Pick a spot with enough overhead clearance to comfortably lift bikes on and off the hooks or shelves.
- For extra stability, use racks with floor stabilizers rested firmly on the ground.
Measuring and mapping out the ideal mounting place will ensure your new bike rack is positioned for performance, security, and convenience.
Install Securely Into Studs
One of the most important steps when installing a wall mounted bike rack is anchoring it firmly into the garage wall studs. Here are some tips:
- Use a stud finder to locate precisely where the wood studs are. Mark them.
- If there are no studs aligned with your desired location, install wood blocking between studs to create a solid mounting surface.
- Drill pilot holes into the studs or blocking using a drill bit slightly smaller than the rack mounting hardware.
- Attach the rack directly into the stud holes using the provided hardware. Do not only anchor into drywall.
- Tighten securely using a screwdriver or drill, but take care not to over-tighten.
- For extra strength, apply construction adhesive like Liquid Nails into the holes before installing the screws.
Taking the time to properly anchor your new bike rack into solid wall studs will provide the strength and stability needed to securely hold your bikes long-term.
Add Protection to Avoid Frame Damage
Bike frames are susceptible to damage from scratches, chips and dents when stored on racks. Here are some ways to safeguard your bike’s frame:
- Use racks with rubber or vinyl-coated holding arms to avoid frame scratches.
- Cut pieces of pool noodles and slide them onto bike hooks for extra padding.
- Wrap handlebar tape around contact points for cushioning.
- Use old inner tubes by cutting along the length and wrapping around frame for protection.
- Attach self-adhesive felt furniture pads onto any rack locations that touch bike frames.
- Cover seat stays with old socks to prevent scratches from bike pedals.
- Position bikes so they don’t touch each other and avoid frame bumps.
Taking a few simple precautions can help keep your beloved bikes looking pristine even when stored on garage racking. Protect that bike investment.
Maintain Proper Tire Pressure
Check and maintain your bike tire pressure regularly when storing bikes on wall racks:
- Underinflated tires can deform and cause bikes to hang askew on the rack, leading to damaged wheels or frames.
- Low pressure also allows wheels to slowly deflate over time when holding the weight of the bike. This can damage wheels.
- Always inflate tires to the recommended PSI rating labeled on the tires themselves. Use a bike pump gauge to verify.
- Check pressure every 4-6 weeks as needed to maintain full inflation.
- Avoid overinflating tires which puts extra stress on the wheel rims.
Proper inflation ensures bikes hang correctly on racks without excess strain on wheels or frames. It only takes a few minutes to pump up those tires.
Utilize Proper Lifting Technique
Bikes can be unwieldy and surprisingly heavy when lifting them onto wall mounted racks. Use these safe lifting methods:
- Face the bike when lifting rather than twisting your body.
- Bend knees and keep back straight to lift with your legs, not strain your back.
- Grip frame firmly with both hands to share weight. Don’t lift by handlebars.
- Pull bike in close to your body to keep it balanced and controlled.
- Move slowly and deliberately. Avoid quick jerky motions.
- Ask a helper to lift the heavier bikes and pass up to you on the rack.
- Use a small step stool if needed for better leverage when lifting.
- Once hung on the rack, make sure the bike is fully settled and stable before letting go.
Using proper lifting form will protect you from muscle strains or injury so you can safely store your bikes all season long.
Consider Multiple Racks for Extra Storage
If your garage bike collection is expanding, consider installing two or more wall mounted racks to increase storage:
- Stagger racks at different heights along the wall to double capacity. Leave 2-3 feet between racks.
- Install another rack on an adjacent wall for even more space.
- Use a mix of rack types – combine horizontal shelves with vertical racks for variety.
- Leave room to walk between racks so all bikes are accessible.
- Ensure each rack is anchored properly into studs or blocking.
- Use matching racks from the same manufacturer for a cohesive look.
- Add racks gradually over time as your bike stash grows. Start with one.
More racks equals more bikes. Scale up your storage with additional wall mounts as needed.
Maintain Proper Garage Conditions
To keep your bikes protected while on wall racks, some basic garage maintenance is required:
- Avoid storing bikes directly beneath overhead garage doors where water could drip onto them.
- Seal any cracks or gaps where rodents could get in and chew brake lines or wiring.
- Install lighting nearby so you can easily see bikes for nighttime access or maintenance.
- Use a dehumidifier to prevent dampness which can cause metal components to corrod.
- Sweep often to keep bugs, leaves and other debris off the bikes.
- Keep garage temperatures moderate. Extreme heat and cold can damage bikes.
Proper conditions will keep your bikes safe from the elements so you can simply park and go all season long.
FAQs
How much weight can wall mounted bike racks hold?
Most hold 2-3 bikes of around 30 pounds each. Some heavy duty racks support up to 100 lbs per bike. Check manufacturer ratings before purchasing.
How far out from the wall do the racks extend?
Protrusion varies by rack type from as little as 5 inches for vertical racks to 16 inches or more for horizontal racks. Measure to make sure they don’t obstruct doors or vehicles.
How difficult are these racks to install?
Basic installation is fairly straightforward with included hardware and instructions. Just ensure you anchor firmly into studs, not only drywall. Hiring a pro is wise if you’re not handy.
What’s the best way to lift a heavy bike onto the rack?
Face the bike and lift with your legs by bending knees and keeping back straight. Bring bike in close to your body for control. Use a step stool for extra leverage in lifting.
What precautions should I take with bikes mounted high on racks?
Use padded racks that protect bike frames. Check tire pressure regularly since overinflated tires can deform at height. Inspect for loose parts that could fall from height.
Conclusion
Installing secure, high-quality wall mounted bike rack for garage provides one of the most space-efficient ways to organize your beloved bikes inside the garage. Ensuring a seamless fit for your garage door weather stripping involves the same meticulous attention as installing a bike rack—carefully measuring your space, finding studs for solid mounting, selecting padding to prevent dings, and properly maintaining bikes and the storage environment will allow you to maximize every inch of vertical room. With the right installation technique, your garage can become a paradise for both weather protection and efficiently storing your two-wheeled fleet all season long. Just take time to find the perfect heavy-duty rack for your needs and bikes will have the ideal year-round home.


