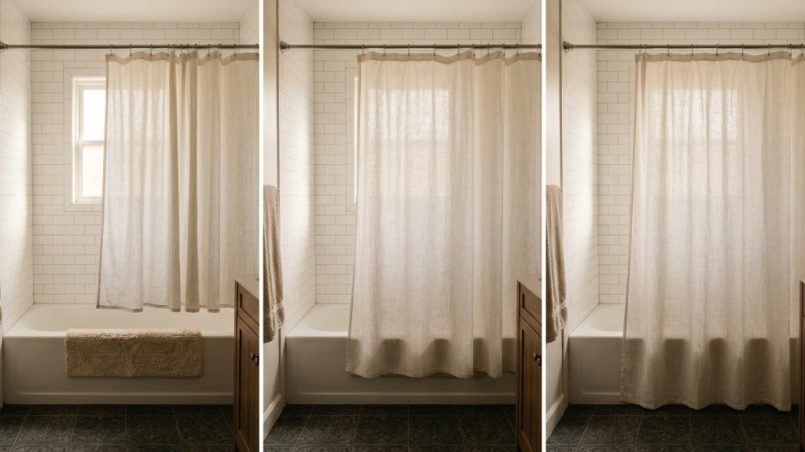
Most tub-and-shower combinations need a 72-inch curtain, usually paired with similar width. However, measure your installed rod because hardware and hem position change the finished drop. Choose enough coverage without letting fabric touch the tub floor or bathroom floor.
Correct shower curtain lengths keep water contained, improve drying, and give the room balanced proportions. A short panel exposes gaps, while an oversized panel traps moisture in folds. Therefore, accurate sizing protects both function and bath decor.
This measuring guide covers tubs, stalls, curved rods, liners, hooks, and unusual layouts. You will learn standard curtain sizes, practical drop calculations, and material considerations. Finally, a reusable checklist will simplify every future replacement.
Why shower curtain length matters
Curtain length controls where water travels after spray reaches the fabric. Adequate overlap directs runoff toward the tub or shower base. Conversely, a high hem lets droplets rebound onto nearby flooring.
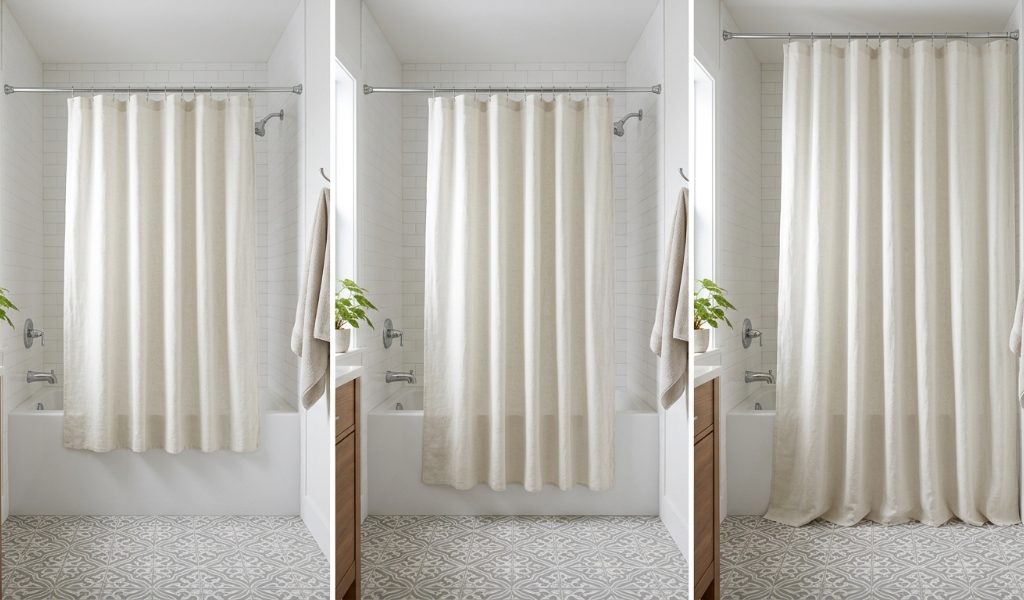
The liner handles most water control because it hangs inside the wet area. Meanwhile, the decorative curtain usually stays outside a bathtub. Each layer therefore needs a separate, deliberate ending point.
A short liner may rise above the tub rim during normal movement. Consequently, water can escape near the corners or center opening. Proper length maintains overlap even when warm air moves the material.
Excess length creates different problems near the bottom. Fabric touching a wet surface dries slowly and collects soap residue. Furthermore, pooled material can hide small puddles until someone steps nearby.
Clearance also improves routine cleaning around the bathing area. A free-hanging hem lets you wipe the floor and tub easily. Likewise, better airflow supports mildew resistance between showers.
Visual proportion matters because the curtain occupies a large wall area. A clean vertical drop can make a compact bathroom feel taller. However, uncontrolled folds make even premium fabric look poorly fitted.
Longer panels often suit high ceilings and elevated rod positions. Shorter panels can fit low rods or shallow enclosures more naturally. The room’s measurements should guide style, rather than fashion alone.
Length also affects how smoothly a curtain opens and closes. Dragging fabric increases resistance and pulls against grommets or buttonholes. Over time, that strain can distort the header and weaken seams.
A stretched panel creates another type of stress. Without enough width, the end holes carry repeated tension. Therefore, length and width must work together for durable movement.
Safety deserves equal attention during sizing. Floor contact creates a possible trip point near a slippery surface. Meanwhile, poor water coverage can leave an unseen puddle outside the tub.
Children, older adults, and busy households benefit from predictable clearance. A visible hem leaves fewer hidden folds underfoot. Additionally, a secure liner reduces water around bath mats and transitions.
The ideal result combines coverage, airflow, movement, and visual order. No single packaged label can guarantee that result. Instead, measure the complete installed system before choosing a panel.
Standard shower curtain sizes
Manufacturers sell several familiar dimensions for common American bathrooms. Packaging normally lists width first and length second. Therefore, always confirm the order before comparing products.
| Size category | Width | Length | Typical application |
| Standard | 72 inches | 72 inches | Tub/shower combination |
| Standard alternative | 70 inches | 72 inches | Tub/shower combination |
| Stall | 54 inches | 78 inches | Enclosed shower stall |
| Extra-long | 72 inches | 84 inches | High rod or tall opening |
| Extra-extra-long | 72 inches | 96 inches | Very high rod or custom drop |
A 72-by-72-inch panel provides the usual starting point for a tub combination. Many sellers also offer a 70-by-72-inch standard alternative. Still, rod placement can make either option unsuitable.
Shoppers often ask about the average shower curtain length when planning a straightforward replacement. The familiar answer usually means 72 inches, not a marketplace-wide mathematical average. Accordingly, treat 72 inches as a benchmark rather than a guarantee.
The 54-by-78-inch stall size solves a different geometry problem. Its narrower width limits bulky gathering across a small opening. Meanwhile, its extra height can cover a taller shower entrance.
An 84-inch panel suits many elevated rods and tall openings. A 96-inch option covers even greater vertical distance. However, both listed options retain a 72-inch width.
Longer does not automatically mean wider. A broad enclosure may require additional width, separate panels, or custom fabrication. Therefore, calculate width and length independently before shopping.
Standard categories simplify comparison, but product dimensions can still vary. Read the actual label instead of trusting words like standard or extra-long. Also, confirm whether the package describes a curtain, liner, or combined system.
A standard panel should hang with relaxed folds when closed. It should not stretch tightly between both ends. Nevertheless, excessive bunching can trap moisture and make sliding harder.
Tub combinations usually need coverage beyond the visible basin. The fabric follows the rod, not the tub’s interior footprint. Consequently, wall-to-wall measurement gives a better starting point.
Freestanding tubs require even more careful width planning. Their curtains may wrap around two, three, or four sides. In that case, measure the full travel path and include an opening overlap.
Two panels can handle a long path more smoothly than one oversized panel. They divide weight and simplify access from either side. However, their meeting edges need enough overlap to block spray.
Standard dimensions help most when your installation follows conventional proportions. Unusual rods, ceilings, and tubs require more precise decisions. Fortunately, the same measuring process works for every layout.
Use the table to identify likely candidates before measuring. Then compare each candidate against the finished drop and hanging path. This sequence prevents labels from driving the decision prematurely.
How to measure for a shower curtain
Accurate sizing starts with the installed rod, not the tub. Use a rigid tape for straight spans and a flexible tape for curves. Then record every measurement in inches.
Measure after placing the rod in its final position. If installation must wait, mark proposed endpoints with removable tape. This mock-up reveals proportion problems before drilling.
1. Measure the width at the rod
Measure along the line where the curtain will actually travel. For a straight rod, record the distance between support points. For a tension rod, measure wall to wall at its planned height.
The shower curtain rod length matters more than the basin width below. Fabric must cover the rod’s path while maintaining side overlap. Therefore, never substitute a tub measurement for the hanging span.
Curved rods require a path measurement rather than a straight shortcut. Run flexible tape along the curve from one endpoint to another. Alternatively, measure connected short sections and add them carefully.
Corner rods need the same path-based approach. Measure each straight segment and include the corner transition. Then note where separate panels might overlap without blocking entry.
Wall spacing can change slightly at different heights. Tile edges, trim, or sloped walls sometimes narrow the proposed location. Accordingly, measure exactly where the rod will sit.
2. Add enough width for comfortable fullness
A curtain needs gentle folds when fully closed. Those folds allow movement and protect against small measurement errors. They also help the ends stay near the wet-area boundaries.
Add roughly 10 to 15 percent to the measured rod path. For example, a 60-inch span needs about 66 to 69 inches. Then choose the nearest practical available width.
This allowance provides modest fullness without heavy crowding. However, unusual fabrics may behave differently along the rod. Thick textiles need more space between folds than lightweight liners.
Avoid stretching the panel completely flat across the opening. Tension can pull the first and last holes inward. It also creates gaps whenever someone moves the curtain.
Too much fullness brings its own drawbacks. Dense folds hold moisture and resist smooth opening. Therefore, choose controlled ease rather than maximum width.
When two panels meet, plan their center overlap separately. A narrow overlap may open when warm air lifts the fabric. Conversely, excessive overlap can make daily entry frustrating.
3. Measure the finished drop
Start from the rod’s top or another repeatable reference point. Measure downward to the desired hem location. Later, you will subtract the hardware’s actual drop.
For an outer curtain, target about 1 to 2 inches above the nearby surface. That surface may be the bathroom floor or the tub’s outside edge. Choose the point that supports both style and cleaning.
For a liner, measure inside the tub or shower base. The hem should sit just above the interior floor. This position directs water downward without leaving material in pooled water.
Measure both ends and the center of the rod. Floors, tubs, and rods can sit slightly out of level. Use the smallest safe clearance when comparing the readings.
Record separate curtain and liner targets when their hanging planes differ. A double rod can place each layer at another height. Likewise, different hardware can create different finished drops.
4. Subtract the hardware drop
Hooks and rings add distance below the rod. Many setups add roughly 1 to 2 inches. Still, measure your actual hardware because designs vary.
Attach one hook or ring to the panel before final installation. Next, measure from the rod’s top to the fabric’s top edge. That distance represents the hardware drop.
Subtract the measured hardware drop from the total target drop. For example, subtract 2 inches from a 74-inch rod-to-hem distance. The resulting fabric length equals about 72 inches.
Treat this example as arithmetic, not a universal setup. Your grommets, rings, and rod diameter can change the result. Therefore, test one hanging point whenever possible.
Hookless curtains need another reference because built-in openings sit around the rod. Measure from the actual fabric support point to the hem. This method avoids adding hardware that the design does not use.
5. Choose the nearest suitable standard length
Compare your calculated fabric length with 72, 78, 84, and 96 inches. Preserve water coverage while avoiding floor contact. When options bracket your number, consider rod adjustment before altering fabric.
A tension rod commonly adjusts from 41 to 72 inches. You can also reposition it vertically without drilling permanent holes. Consequently, this rod offers useful flexibility for near-standard measurements.
Fixed rods require more planning before installation. Tape the proposed top line and hang a temporary panel. Then verify clearance from the doorway, tub, and showerhead positions.
Do not raise the rod merely to create a dramatic look. First, confirm that the liner will still overlap the wet area. Function should establish the acceptable range before design chooses the final point.
Write four numbers after completing the process: rod path, fullness width, target drop, and hardware drop. Also record the chosen product dimensions. These notes make future replacements much faster.
Curtain vs liner: how sizing differs
The decorative curtain and liner perform related but separate jobs. The curtain shapes the room’s appearance and provides privacy. Meanwhile, the liner sends water back toward the drain.
Their positions create different practical targets. The outer layer usually hangs outside a bathtub. Conversely, the liner stays inside the wet area.
Many standard installations use matching nominal dimensions for both layers. However, matching labels do not guarantee matching installed hems. Hardware, rod position, and material weight can alter each drop.
Compare actual shower curtain liner sizes before selecting a companion for your outer panel. Sellers may call both 70-by-72-inch and 72-by-72-inch products standard. Therefore, read the numbers instead of relying on category names.
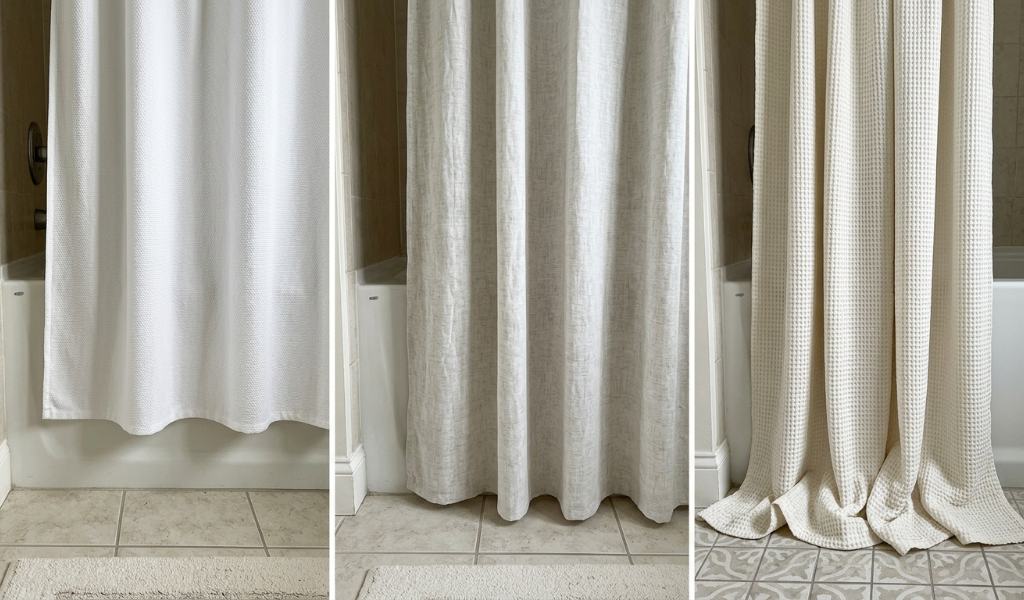
The liner needs enough length to remain below the tub rim. It should also stop just above the tub floor. This balance supports drainage and faster drying.
A liner that hangs too high can release spray underneath. Movement from airflow may expose even more of the opening. Accordingly, check the lowest coverage during a normal shower.
An overly long liner can fold across the tub floor. Those folds collect residue and restrict airflow. They may also drift toward someone’s feet.
Width matters just as much as length. A narrow liner can pull away from the wall or center opening. Add moderate fullness so it maintains coverage during movement.
Matching widths often keep hanging holes aligned on shared hooks. This arrangement lets both layers move together. However, independent hooks can simplify cleaning and replacement.
A double rod separates the decorative curtain from the liner. Each layer can then use its own hardware and drop. Measure both planes because even small offsets affect the hems.
Material also changes perceived length. A weighted liner hangs straighter than a lightweight sheet. Meanwhile, absorbent fabric may relax differently after washing.
Do not trim a liner before testing it in place. First, hang it from the intended rod and hardware. Then inspect its position at both ends and the center.
A same-size pairing works well for many conventional tubs. Still, a shallow basin or high outer panel may need different lengths. Choose each layer according to its own function.
When you need an extra-long curtain
Extra length solves a measured vertical gap. It often suits high rods, tall ceilings, and elevated mounting points. Additionally, some freestanding tubs require greater coverage below the rod.
Start by testing whether a 72-inch panel reaches the target hem. If it falls short, compare the missing distance with taller categories. An 84-inch or 96-inch panel may solve the problem cleanly.
The liner must preserve its inside overlap at the new height. Therefore, an extra long shower curtain liner deserves separate measurement before purchase. Never assume the decorative panel automatically determines the liner.
Tall panels can strengthen vertical proportions in rooms with high ceilings. A higher rod draws the eye upward and reduces awkward wall space. Yet the hem must still avoid puddling.
An 84-inch curtain on a low rod adds unnecessary fabric. It may gather at the tub or bathroom floor. Consequently, extra length helps only when the installation uses it.
A 96-inch option addresses very high rods or custom drops. However, width remains 72 inches in the reference table. Broad and tall openings may need two panels or custom work.
Curved rods can influence extra-long decisions indirectly. Installers sometimes mount them above the previous straight rod. Their outward curve may also change the visual relationship with the tub.
Measure after positioning the curved rod whenever possible. Check the drop at its center and both endpoints. Then confirm that the liner stays inside throughout the curve.
Clawfoot tubs often combine tall rods with wraparound coverage. Here, width and length interact more visibly. A long panel still fails when it cannot close around the full perimeter.
Ventilation matters more as fabric approaches the floor. Longer material creates more surface area and heavier folds. Therefore, spread the curtain fully after each shower.
Consider daily access before choosing an elaborate tall treatment. The panel should glide without catching the tub, toilet, or nearby storage. A beautiful installation still needs easy movement.
Renters can often test length with a movable tension rod. Homeowners using fixed hardware should mock up the hem first. Both methods protect against an expensive placement mistake.
Choose extra length only after completing the drop calculation. Then verify width, material, and care requirements independently. This process produces a tall look without sacrificing function.
What length looks best?
The best-looking curtain usually appears intentional and easy to maintain. A long, straight drop creates visual calm across a busy bathroom. However, the hem should not collect on a wet surface.
Many homeowners ask, Do longer shower curtains look better, before raising their rod. They often do when the new height suits the room’s proportions. Still, alignment creates elegance more reliably than added fabric alone.
A hem about 1 to 2 inches above the floor looks tailored. That small gap also supports airflow and simple cleaning. Therefore, this position balances appearance with everyday care.
A floor-kissing hem can photograph beautifully in a dry space. Bathrooms create moisture, dust, hair, and frequent foot traffic. Even slight contact can therefore shorten the clean-looking period.
Deliberate puddling creates the greatest practical compromise. Folded fabric stays damp longer and hides debris. Moreover, pooled material can create a tripping hazard.
Ceiling height changes how viewers perceive the curtain. A low rod can divide a tall wall awkwardly. Raising it may create a stronger vertical line with suitable fabric.
Small bathrooms can also benefit from vertical emphasis. Yet heavy, oversized folds may overwhelm limited space. Choose lighter visual weight and controlled fullness instead.
Pattern scale deserves attention before final placement. Large motifs need enough uninterrupted length to read clearly. Conversely, a border print may look wrong after hemming.
Solid colors and small textures tolerate adjustment more easily. They also let hardware and tile lines guide the composition. Thus, simple designs suit uncertain installations.
Use nearby architecture to judge rod height. Tile edges, windows, mirrors, and door frames create visual reference lines. Nevertheless, water coverage should overrule decorative alignment.
The curtain’s color can influence perceived scale. A light panel may feel airy across a long drop. A dark, dense fabric can make the same area feel heavier.
Fullness also changes the finished look. Relaxed folds create depth without appearing crowded. Excess width, however, compresses patterns and makes the rod look busy.
Hardware finish contributes to the overall line. Slim rings keep attention on the fabric. Larger decorative hooks can lower the panel and add visual interruptions.
Try a temporary mock-up before buying an expensive curtain. Tape the proposed top line and hang a sheet. Then view the setup from the doorway and inside the room.
Check the mock-up with the panel open and closed. Also consider the liner’s separate position inside the tub. A good design should work in both states.
Select the functional hem first, then refine the visual height. This order prevents style from creating leaks or maintenance problems. Ultimately, precision looks better than unnecessary length.
Hanging hardware: rods, hooks, and rings
Hardware connects nominal dimensions to the finished installation. Rod height sets the starting point, while rings create the final offset. Consequently, small components can change the hem by several visible inches.
Straight tension rods offer easy adjustment and rental-friendly installation. Their common adjustable range spans 41 to 72 inches. Still, the contact surfaces must support the chosen load securely.
Fixed rods provide stability when installers use suitable anchors. They work well for heavy fabric or permanent layouts. However, drilling leaves little room for later height corrections.
Curved rods create more shoulder room inside a tub. Their arc also lengthens the hanging path compared with a straight shortcut. Therefore, measure the curve before selecting width.
Double rods separate the liner and outer curtain. This arrangement simplifies independent cleaning and styling. It also creates two different hanging planes that require separate measurements.
Hooks and rings commonly add roughly 1 to 2 inches of drop. Actual designs vary in shape and connection point. Measure one assembled unit before trusting a general estimate.
When choosing shower curtain hooks, check movement, fit, and finished drop. Smooth hardware reduces pulling against the curtain header. Additionally, secure closures prevent accidental release.
Many 70-inch or 72-inch-wide panels use 12 hanging points. Count the actual holes before buying hardware. Unusual widths or custom panels may require another number.
Grommets reinforce openings and distribute repeated movement. Buttonholes can also perform well when stitching remains intact. Either design needs evenly spaced support across the rod.
Never skip openings to force a mismatched hook count. Uneven spacing concentrates stress and distorts folds. Instead, match hardware quantity to the panel.
Roller-style hooks can reduce friction on a metal rod. Closed rings offer security, while open hooks simplify removal. Choose the mechanism that fits your cleaning routine.
Hookless curtains use built-in openings around the rod. They remove separate hardware from the drop calculation. Nevertheless, the opening position still affects the fabric’s supported length.
Keep the rod level after adding the full curtain weight. Rings can drift toward a low endpoint. Furthermore, an uneven rod makes a square panel appear crooked.
Recheck tension rods after several showers. Moisture and movement may reduce their grip over time. If the rod shifts, restore its measured position before judging length.
Finally, follow the hardware maker’s installation and load instructions. Correct measurements cannot compensate for unstable support. A secure, level rod protects both safety and appearance.
Special cases: stalls, clawfoot tubs, and curved rods
Shower stalls often need narrower, taller panels than tub combinations. The reference stall size measures 54 inches wide and 78 inches long. Even so, direct measurement should decide the fit.
Start with the stall’s hanging width and curb position. The liner must remain inside the base during use. Meanwhile, the outer curtain should avoid crowding the entrance.
Doorless stalls need careful side coverage. Identify the showerhead direction and likely splash path. Then position overlap where water pressure cannot expose a gap easily.
A narrow stall can suffer from excessive fabric. Dense folds reduce usable space and dry slowly. Therefore, avoid choosing standard tub width without checking the opening.
Clawfoot tubs require a different measuring mindset. Their rods often surround multiple sides rather than spanning one wall. Measure the complete perimeter that the curtain must cover.
Also include enough overlap at the entry point. Water can escape through a meeting seam during movement. Place that seam away from the strongest spray whenever possible.
One large panel may feel heavy around several corners. Two or more panels can divide the load and improve access. However, every additional seam requires deliberate overlap.
Freestanding tubs may sit away from any wall. Their curtains need balanced support around the whole wet area. Accordingly, ceiling supports and rod joints can affect panel movement.
Measure around hardware interruptions rather than through them. A support bracket may stop certain hooks from passing. Separate panels can solve this movement problem without changing total coverage.
Curved rods need width measurements along their arcs. A straight endpoint measurement understates the fabric’s travel distance. Use flexible tape or connected short measurements.
The curve can move the curtain farther from the tub rim. Check whether the liner still falls inside at the center. If not, adjust rod placement before adding length blindly.
Corner and L-shaped showers combine several straight segments. Record each segment, then add them for the total path. Also note where hooks can pass through bends.
Some corner hardware limits movement at the joint. In that case, two panels may work better than one. Plan overlap near the corner without creating a permanent opening.
Uneven floors complicate all unusual layouts. Measure the drop at endpoints, corners, and the center. Protect the shortest floor clearance when selecting length.
Sloped ceilings may also influence rod placement. Keep the rod level even when nearby architecture slopes. Otherwise, rings drift and the hem appears uneven.
Built-in benches can redirect splash toward the curtain. Their presence does not automatically require extra length. Instead, evaluate spray direction and liner overlap during use.
Mobility needs may change the best arrangement. Multiple lighter panels can provide easier entry than one heavy wraparound curtain. Keep pathways clear and hardware easy to operate.
Create a simple sketch before shopping for a special enclosure. Mark rod segments, openings, supports, showerhead direction, and target hems. This drawing reveals whether width, length, or movement creates the main challenge.
Materials change how a measured length hangs
Material influences drape, drying speed, weight, and care. Therefore, identical labeled dimensions can look different after installation. Choose size first, then evaluate how the material behaves.
Polyester fabric usually forms softer folds than stiff plastic. It can support decorative patterns while remaining practical for regular washing. Check the care label before choosing permanent rod height.
Cotton creates a familiar textile appearance. However, moisture absorption makes a separate liner important for many setups. Washing can also change the finished dimensions.
Prewash washable cotton according to its care label before drilling supports. Then hang the dry panel and recheck its drop. This step prevents later surprises from dimensional change.
Many suppliers abbreviate polyethylene vinyl acetate as PEVA. This material provides water-resistant liner options. Vinyl also blocks water effectively in many products. Follow each maker’s care guidance because constructions vary.
A weighted hem helps a lightweight liner hang straighter. Magnets can also hold some liners near compatible metal tubs. Neither feature replaces correct length or adequate width.
Excessive weight can strain weak grommets or buttonholes. Inspect the header and stitching before installation. Then distribute support through every reinforced opening.
Stiff material forms broader folds and may crowd a short rod. Softer fabric can compress more easily. Nevertheless, any tightly bunched material dries more slowly.
Air movement changes how lightweight liners behave. Warm rising air can pull them inward during showers. Proper fullness and a weighted hem can improve stability.
Mildew resistance depends on more than a product label. Airflow, cleaning, humidity, and drying habits all matter. Spread the curtain after each use to expose wet surfaces.
Do not leave either layer compressed at one rod end. That position traps moisture between folds. Instead, close both layers fully until they dry.
Texture affects perceived length as well. Heavy woven fabric can look shorter because folds project outward. Smooth materials emphasize the full vertical line.
Patterns may shift visually when the curtain gathers. Large images need enough width and drop to remain readable. Small repeats tolerate folds more gracefully.
Colorfastness and cleaning compatibility influence long-term appearance. Harsh treatment can distort hems or damage coatings. Always follow the attached care label rather than general internet advice.
Remove hooks before washing when the design allows. Hardware can snag fabric or damage a washing machine. Afterward, reinstall the panel and confirm the hem remains level.
Material choice should support the bathroom’s ventilation and cleaning routine. A beautiful fabric becomes frustrating when maintenance exceeds household habits. Practical compatibility preserves both fit and appearance.
Seasonal and novelty curtains use the same measurements
Seasonal curtains can refresh bath decor without changing permanent finishes. Their artwork changes, but the fitting process remains identical. Record reliable measurements once and reuse them for every swap.
A themed christmas shower curtain still needs functional width and length. Confirm the package dimensions before considering colors or patterns. A festive design cannot correct exposed gaps or dragging fabric.
Keep the liner independent whenever practical. Then you can replace the decorative layer without disturbing water control. This approach also reduces setup time during busy seasons.
Compare header styles across decorative panels. Grommets, buttonholes, and fabric loops may hang from different points. Therefore, equal labeled lengths can produce different finished drops.
Test one hook before changing the rod position. This quick check reveals whether the new panel sits higher or lower. It also protects a carefully measured liner setup.
Pattern placement may affect the visual result. A large central motif needs enough open width to remain visible. Meanwhile, border designs need an unaltered lower hem.
Avoid trimming seasonal panels before testing their full installation. A higher rod or shorter hook may solve minor excess length. Permanent alterations can also distort printed artwork.
Store off-season curtains only after complete cleaning and drying. Moisture trapped in folded fabric can create odors or spotting. Follow the care label before long-term storage.
Fold panels along existing seams when possible. Keep heavy objects away from grommets and decorative elements. Additionally, label each stored curtain with its actual dimensions.
Inspect the header and hem before reinstalling a stored panel. Look for weak stitching, cracked openings, or stiff residue. Repair small problems before the curtain carries wet weight.
Keep your rod path and drop notes with bathroom supplies. Those measurements simplify future purchases and gift decisions. They also prevent repeated guesswork after remodeling.
Seasonal swaps work best when each panel meets the same fit standard. Choose artwork only from options that cover the opening properly. Then enjoy the change without sacrificing safety or drying.
Common measuring mistakes to avoid
Many sizing problems begin with the wrong reference point. People often measure the tub basin instead of the rod. This shortcut can underestimate the required width significantly.
Measure the complete hanging path, including curves and corners. Also account for any bracket that blocks hook movement. The curtain must function along the actual rod.
Another mistake involves stretching fabric flat across the opening. Exact width leaves no room for folds or movement. Add about 10 to 15 percent for modest fullness.
However, avoid adding width without considering material thickness. Heavy fabric can crowd a compact rod quickly. Choose enough ease for coverage, not decorative excess.
People also forget the drop created by rings or hooks. That omission can lower the hem by roughly 1 to 2 inches. Measure the actual hardware before finalizing length.
Reading dimensions backward causes surprisingly common errors. Packaging usually presents width before length. Confirm both numbers and their units before purchase.
The word standard creates another trap. Sellers may use it for 70-by-72-inch and 72-by-72-inch products. Therefore, compare actual dimensions rather than labels.
Measuring at only one point can hide uneven conditions. Check both ends and the center for vertical drop. Then preserve clearance at the shortest location.
A level rod can still hang above an uneven floor. Likewise, a level floor does not guarantee a level rod. Independent measurements reveal these differences.
Moving a tension rod after measuring changes the entire calculation. Even a small height shift alters the finished hem. Mark the approved position with removable tape.
Choosing curtain length before hardware creates unnecessary uncertainty. Hooks, rings, and hookless openings all change support points. Select or measure hardware early in the process.
Matching curtain and liner labels without checking their positions can also fail. Each layer follows a different path around a tub. Accordingly, measure separate target hems.
Some buyers assume a longer panel improves every bathroom. Extra fabric only helps when the measured drop needs it. Otherwise, added length creates damp folds and clutter.
Others trim a new curtain too quickly. First, test rod adjustment and alternative hardware. Then consider hemming only when the material supports alteration.
Ignoring the showerhead direction can expose side gaps. A technically wide curtain may still leak near strong spray. Position overlap according to real water movement.
For wraparound rods, people sometimes forget entry overlap. The total perimeter alone does not cover the meeting seam. Add enough width for secure closure there.
A product photo cannot establish fit for your bathroom. Camera angle, styling, and hidden clips can change appearances. Use your measurements as the deciding evidence.
Finally, discarding your notes forces repeated work. Save the rod path, drops, hardware offset, and product size. These four details turn future shopping into a quick comparison.
Frequently asked questions
What is the standard shower curtain size?
A 72-by-72-inch curtain fits many tub combinations, although a 70-by-72-inch version also counts as standard.
Should a shower curtain touch the floor?
No, leave about 1 to 2 inches of clearance to improve drying, cleaning, and safety.
How do I measure shower curtain length?
Measure from the rod to your target hem, then subtract the actual drop from hooks or rings.
Should the liner match the curtain size?
Matching dimensions often work, but separate hem positions may require different lengths for proper water control.
How high should I hang the shower curtain rod?
Set rod height from your chosen curtain, hardware drop, target hem, and required liner overlap.
Your next step: a measuring checklist
Before shopping, complete a final check with the installed rod. Record each result in inches and note any unusual shape. This short process prevents most returns and alterations.
Use this field checklist before shopping. Complete each item before purchasing:
- Measure the full rod path, including every curve and corner.
- Add 10 to 15 percent for relaxed fullness.
- Record separate curtain and liner target hems.
- Measure both endpoints and the center drop.
- Measure the actual hook, ring, or opening offset.
- Compare your result with 72, 78, 84, and 96 inches.
- Confirm width, length, hanging-hole count, material, and care instructions.
- Check that the liner stays inside the wet area.
- Confirm that fabric clears every walking and cleaning surface.
- Save the final measurements for future replacements.
Photograph the rod and note where each layer hangs. Keep that record with household project notes or your phone. Future purchases will then require comparison, not fresh guesswork.
If your result falls between standard lengths, test rod adjustment first. Next, compare hardware with a shorter or longer drop. Consider alteration only after those reversible options fail.
For fixed hardware, build a temporary mock-up before drilling. View the panel from several angles and test normal movement. Also verify the liner’s position inside the tub.
For curved or wraparound rods, ask someone to hold the tape. Cooperative measuring keeps the tape against the complete path. It also reduces addition errors across several segments.
Finally, choose the panel that satisfies function before style. Confirm coverage, clearance, movement, and drying first. Then select the color, texture, and pattern that complete your bathroom.
Measure your rod today and save the four controlling numbers. With that record, you can buy confidently and avoid damp, awkward fabric. Start with the hanging path, then let the room’s proportions guide your final choice.