Hey there, DIY enthusiasts and weekend warriors! So, your garage roof needs some TLC, but you’re not exactly keen on shelling out big bucks for a professional roofer? Well, you’re in luck because we’ve got your back. In this guide, we’ll walk you through step by step how to repair a garage roof all by yourself, without breaking the bank or breaking a sweat.
Why DIY Roof Repair?
Before we dive into the nitty-gritty of repairing your garage roof, let’s talk about why you should consider doing it yourself.
- Cost Savings: Hiring a professional roofer can be expensive. By tackling the job yourself, you’ll save a significant amount of money.
- Learning Opportunity: DIY roof repair is a valuable skill. You’ll gain hands-on experience and learn something new along the way.
- Pride of Accomplishment: There’s nothing quite like the feeling of looking at your finished roof repair and knowing you did it all by yourself.
Now that you’re motivated, let’s get started!
Assess the Damage
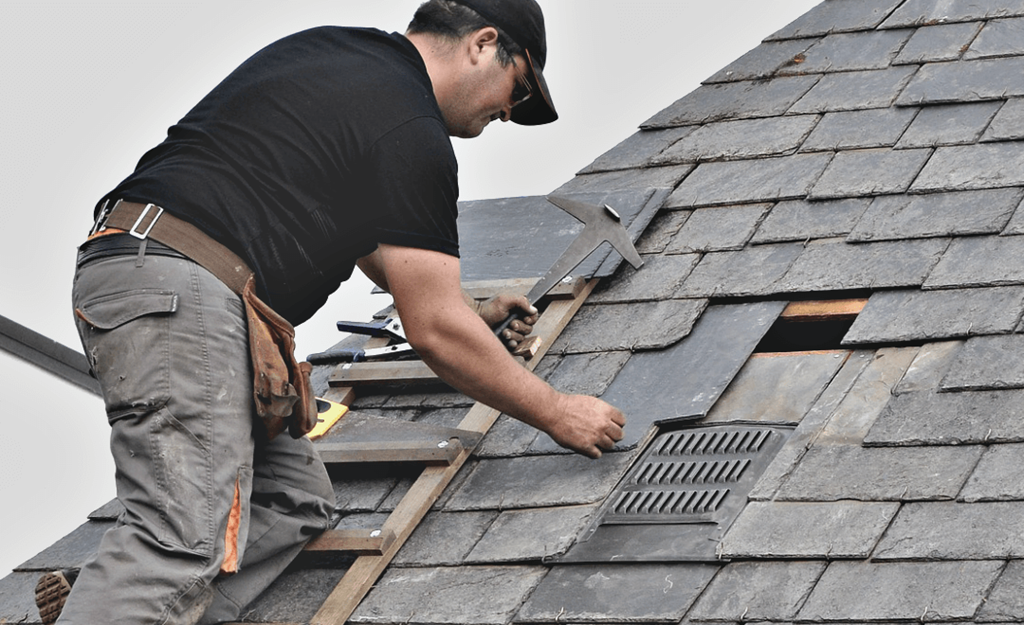
First things first, you need to assess the extent of the damage. Is it a minor issue, like a leak, or a more significant problem that requires extensive repairs? Grab your ladder, put on your safety gear, and climb up to take a closer look.
Pro Tip: Use binoculars to inspect the roof from the ground before getting on the ladder to ensure your safety.

Now, here are some things to look for:
- Missing or Damaged Shingles: Are there shingles that are cracked, torn, or completely missing?
- Leaks: Check for water stains on the ceiling of your garage. This can indicate a leak in the roof.
- Flashing: Inspect the flashing around vents, chimneys, and other roof penetrations. Damaged flashing can lead to leaks.
- Sagging Areas: Do you notice any sagging or uneven sections of the roof? This could be a sign of structural damage.
Once you’ve identified the issues, you can decide whether it’s a job you can handle yourself or if you need professional help. For minor issues like a few missing shingles or small leaks, DIY is definitely doable.
Gather Your Tools and Materials
Before you start the actual repair work, make sure you have all the necessary tools and materials at your disposal. Here’s a list to get you started:
- Safety Gear: Safety should always come first. Ensure you have a sturdy ladder, a hard hat, safety glasses, and gloves.
- Roofing Materials: Depending on the type of roof you have, you may need shingles, roofing nails, roofing cement, and flashing.
- Tools: Common tools include a hammer, pry bar, utility knife, roofing nails, a roofing nail gun (if available), a caulking gun, and a putty knife.
- Underlayment: If your roof has significant damage, you may need to replace the underlayment as well. Make sure you have enough underlayment material on hand.
- Ventilation: Adequate ventilation is crucial for the longevity of your roof. If your garage doesn’t have proper ventilation, consider adding roof vents.
Start with Small Repairs
Now that you’ve got your tools and materials ready, it’s time to dive into the actual repair work. We’ll start with some common small repairs that you can handle on your own.
Repairing Missing Shingles
- Remove the damaged shingle: Use your pry bar or a flat shovel to carefully lift the shingle above the damaged one. Then, remove the damaged shingle by loosening the nails.
- Replace the shingle: Slide the new shingle into place, aligning it with the adjacent shingles. Secure it with roofing nails, making sure to drive the nails just below the overlapping shingle.
- Seal the edges: Apply a layer of roofing cement to seal the edges of the new shingle. This will prevent water from seeping underneath.
Fixing Small Leaks
- Locate the leak: Check your garage ceiling for water stains to pinpoint the leak’s location on the roof.
- Inspect the area: Climb up to the roof and inspect the area around the leak. Look for damaged or missing shingles.
- Seal the leak: Use roofing cement to seal the area around the leak. Apply it generously, ensuring complete coverage.
- Replace damaged shingles: If there are damaged shingles in the area, replace them following the steps mentioned earlier.
Repairing Flashing
- Remove old flashing: Carefully remove the damaged or old flashing using a pry bar.
- Install new flashing: Cut the new flashing to size and install it in the same location as the old one. Secure it in place with roofing nails.
- Seal the edges: Apply roofing cement to seal the edges of the flashing and prevent water intrusion.
Remember, these are basic repairs, and if you’re unsure at any point, it’s a good idea to consult online tutorials or seek advice from a local hardware store.
Tackle More Extensive Repairs
For those of you feeling a bit more adventurous and skilled, let’s move on to some slightly more involved garage roof repairs.
Addressing a Sagging Roof
If you’ve noticed a sagging section of your garage roof, it’s essential to address it promptly to prevent further structural damage. Here’s what you can do:
- Support the roof: Install temporary supports beneath the sagging area to lift it back into place. Use wooden beams or jacks for this purpose.
- Replace damaged rafters: If the sagging is due to damaged rafters, you’ll need to replace them. This is a more advanced repair and may require the help of a professional carpenter.
- Reinforce the structure: To prevent future sagging, consider adding additional support beams or trusses to strengthen the roof’s structure.
Replacing Underlayment
If the underlayment of your garage roof is damaged, it’s essential to replace it to maintain the roof’s integrity. Here’s how:
- Remove shingles: Carefully lift and remove the shingles covering the damaged underlayment.
- Replace the underlayment: Roll out a new underlayment material, ensuring it covers the entire damaged area. Secure it in place with roofing nails.
- Re-shingle: Once the underlayment is in place, re-install the shingles you removed earlier.
These repairs require more skill and expertise, so don’t hesitate to seek guidance or assistance if you’re not confident in your abilities.
Preventative Maintenance
Now that you’ve tackled the necessary repairs, it’s time to think about preventing future problems. A little maintenance can go a long way in extending the life of your garage roof.
- Regular Inspections: Make it a habit to inspect your garage roof at least once a year. Look for signs of damage or wear and tear.
- Clean Gutters: Keep your gutters clear of debris to ensure proper drainage. Clogged gutters can lead to water backup and roof damage.
- Trim Overhanging Branches: If you have trees near your garage, trim branches that could fall onto the roof during a storm.
- Check Seals and Flashing: Inspect seals around roof penetrations and flashing regularly. Replace any damaged or deteriorated seals promptly.
- Ventilation: Ensure your garage roof has proper ventilation to prevent heat and moisture buildup, which can damage the roof structure.
In conclusion
Repairing your garage roof without professional help is entirely possible, provided you start with small repairs, have the right tools and materials, and prioritize safety. However, it’s wise to consult with a roofing expert for more extensive damage or structural issues. Remember, a well-maintained roof not only protects your garage but also adds to the overall value of your property. So, roll up your sleeves, get out there, and give your garage roof the care it deserves!
FAQs
- Can I repair a large hole in my garage roof by myself?
Repairing a large hole in your garage roof may be a complex task that requires professional help. It involves more than just replacing shingles and may involve structural repairs. It’s best to consult with a roofing expert for such significant repairs.
- How often should I inspect my garage roof for damage?
You should inspect your garage roof at least once a year, ideally in the spring or fall. Additionally, it’s a good idea to check your roof after severe weather events like storms or heavy snowfall.
- What safety precautions should I take when working on my garage roof?
Always prioritize safety. Use a sturdy ladder, wear appropriate safety gear (hard hat, safety glasses, gloves), and avoid working on the roof in adverse weather conditions. Additionally, inform someone of your project in case of an emergency.
- Can I reuse the old shingles when repairing my garage roof?
It’s generally not recommended to reuse old shingles, as they may be damaged or have lost their integrity. It’s best to use new shingles to ensure a proper and long-lasting repair.
- How can I improve the ventilation in my garage roof?
You can improve ventilation by adding roof vents or ridge vents to your garage roof. These vents allow air to flow freely, reducing heat and moisture buildup, which can extend the life of your roof.