
Key Takeaways
- Push fit couplings extend copper pipes in minutes with no tools at all.
- Compression couplings offer a cheap, proven option using basic wrenches.
- Press fittings create permanent extensions with a rented press tool.
- Always match the new pipe size and type to the existing run.
- Measure twice, cut square, and support the new pipe run properly.
Last spring, we bought a utility sink for our laundry room. The perfect spot sat right next to the existing plumbing. However, there was one problem. The copper pipe on the wall was six inches too short to reach the new faucet connections. My first instinct was to call a plumber. Then I remembered the quote for a similar job years ago. Soldering meant a torch, draining the lines, and fire risk near the wall. Therefore, I went looking for a better way.
It turns out that extending copper pipe is one of the friendliest plumbing projects a homeowner can tackle. I completed the whole extension with two fittings and a length of new pipe. The job took forty minutes, and it has stayed leak-free ever since.
If a pipe in your home stops short of where you need it, do not panic. You have several torch-free options. In this guide, I will show you exactly how to extend copper pipe without solder, step by step.
Why Extend Copper Pipe Without Solder?
Soldering is the traditional way to join copper. However, it brings real problems for most homeowners. Knowing these problems helps you pick the smarter path.
Fire risk comes first. A plumbing torch burns hotter than 3,600 degrees Fahrenheit. The National Fire Protection Association reports thousands of structure fires each year from torches used during repair and construction work. Wooden studs and drywall turn small jobs into serious hazards. Therefore, many homeowners rightly avoid flames indoors.
Other common reasons to skip the torch include:
- No experience: Clean solder joints take real practice to master.
- Wet lines: Any leftover water ruins a solder joint completely.
- Tight spaces: Flames cannot fit safely inside walls or cabinets.
- Equipment costs: Torches, fuel, flux, and solder add up fast.
- Rental rules: Many condos and apartments ban open flames.
Additionally, no-solder methods are simply faster. A push fit extension takes minutes from start to finish. Meanwhile, soldering demands draining, cleaning, fluxing, heating, and cooling time. For one extension, the torch-free route wins easily.
Certified mechanical fittings also meet strict plumbing standards. The Copper Development Association confirms that approved mechanical joints handle the same pressures as soldered connections. Therefore, you lose no strength by skipping the torch. You only lose the risk, the mess, and the learning curve.
Finally, think about reversibility. Solder is permanent. Push fit and compression joints can be opened again later. That flexibility matters when plans might change down the road.
Method 1: Push Fit Couplings, the Fastest Extension
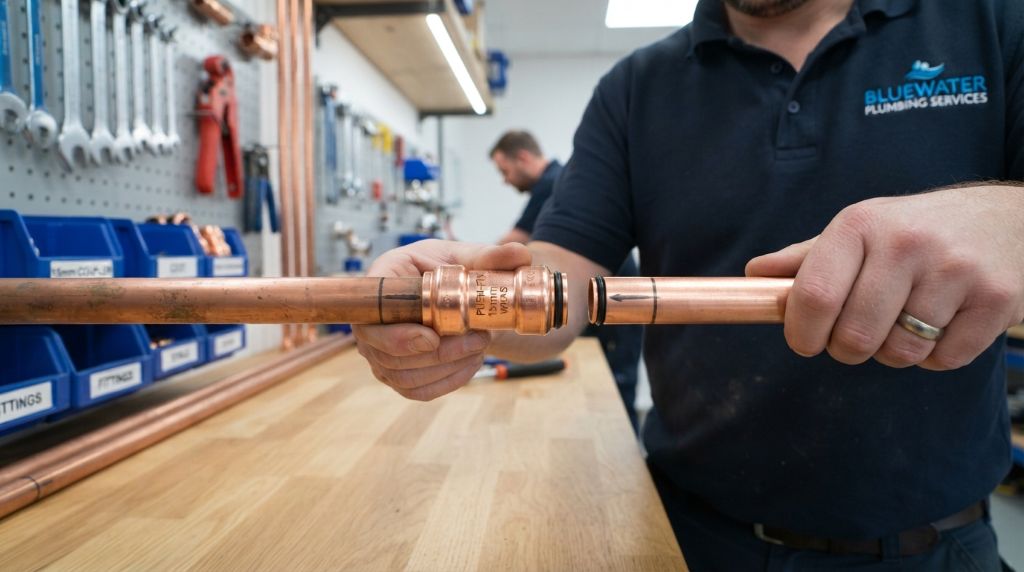
Push fit couplings are my favorite way to extend copper pipe. Brands like SharkBize and JG Speedfit made this technology famous. The idea is wonderfully simple. Push the pipe into the fitting, and the joint seals itself.
Inside each coupling, three parts do the work. A rubber O-ring seals around the pipe wall. Stainless steel teeth grip the pipe’s outer surface. A collet locks everything under pressure. Together, they handle full household water pressure without complaint.
Here is what makes push fits perfect for extensions:
- No tools needed for the connection itself.
- Each joint takes under a minute to make.
- Works on copper, PEX, and CPVC alike.
- Removable with a disconnect clip if you change plans.
- Ideal for tight spaces and beginners.
The extension process follows a clear sequence. First, shut off the water and drain the line. Second, cut the old pipe square with a pipe cutter. Third, deburr and clean both the old pipe and your new pipe section. Fourth, mark the insertion depth on each pipe end. Fifth, push one end into the coupling. Finally, push the coupling onto the existing pipe and tug to test both joints.
Depth marks matter enormously here. A half-inch coupling needs nearly an inch of pipe inside each end. My laundry room project used a four-inch pipe extension with two couplings. One quick miscalculation early on taught me to mark depths before every push. The fitting came off with a disconnect clip, and I reused it without waste.
The only downside is cost. Push fit couplings cost five to ten dollars each. For a single extension, that price is absolutely fair. For many joints, other methods become more economical.
Method 2: Compression Couplings, the Trusted Classic
Compression couplings have joined copper pipes for nearly a century. If you want proven reliability for pocket change, this method belongs on your list. Every hardware store stocks the parts, and you likely already own the tools.
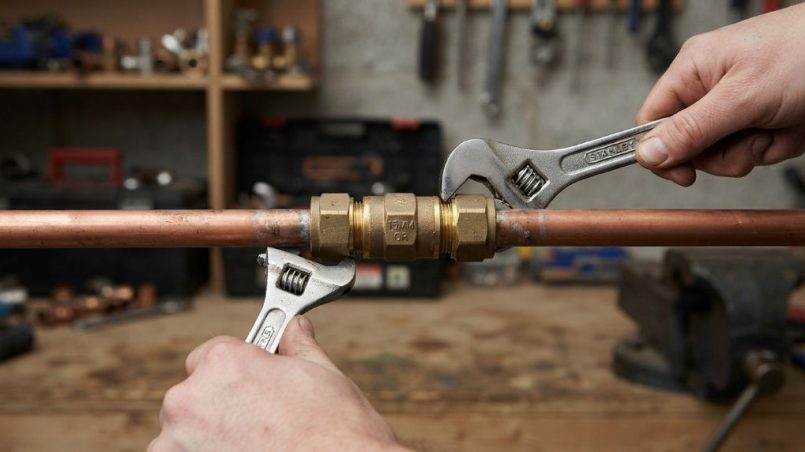
A compression coupling uses three pieces. A brass nut slides onto the pipe first. A small metal ring called a ferrule follows behind it. The pipe then enters the coupling body. Tightening the nut squeezes the ferrule against the pipe. That firm metal squeeze forms the watertight seal.
Follow these steps for a solid extension:
- Shut off the water and drain the line fully.
- Cut the old pipe square and deburr the edges.
- Slide the nut onto the existing pipe, then the ferrule.
- Insert the pipe fully into the coupling body.
- Push the nut and ferrule up to the coupling threads.
- Hand-tighten the nut until it seats.
- Hold the coupling with one wrench and turn the nut one full turn.
That final step carries the secret. Two wrenches stop the coupling from twisting while you tighten. Additionally, resist over-tightening. A crushed ferrule causes leaks rather than preventing them.
Compression couplings cost far less than push fits. Moreover, they create removable joints for future changes. Plumbers still rely on them for supply lines and appliance connections today. My garden irrigation extension uses two compression couplings. They have survived three winters without a single drip.
The limits are worth noting. Most manufacturers do not approve compression joints inside walls or under floors. Therefore, keep them visible and reachable. For exposed extensions like mine, they remain a brilliant choice.
Method 3: Press Fittings, the Professional Route
Press fittings deliver the most solder-like result of all the no-solder methods. If your extension involves many joints or hidden locations, this professional approach deserves consideration.
A press fitting resembles a standard copper fitting. However, it hides an O-ring inside its cup. A battery-powered press tool clamps special jaws around the fitting. The tool crimps the fitting onto the pipe with enormous, even force. The O-ring compresses, and the joint seals permanently.
Here are the standout benefits:
- Permanent joints, approved behind walls in most areas.
- Each crimp finishes in about five seconds.
- No flame, no fire watch, no burn risk.
- Extremely low failure rates when installed correctly.
- One tool covers several pipe sizes with different jaw sets.
The obstacle is the tool itself. A proper press tool costs hundreds of dollars to buy. However, home centers and rental shops rent them by the day. Therefore, the math works for bigger projects. Renting for one weekend easily covers a basement replumb or a long pipe run.
For a single short extension, press fittings usually make less sense. The rental hassle outweighs the benefit. However, knowing this method exists helps you speak confidently with contractors. Many pros now press instead of solder, which often means faster jobs and lower labor bills for you.
Matching the New Pipe to Your Existing Run
An extension is only as good as the new pipe you add. Choosing the right section matters more than beginners expect. Get this wrong, and problems appear later.
Start with size. Measure the outside diameter of your existing pipe carefully. Half-inch and three-quarter inch are the most common residential sizes. The new pipe must match exactly. A mismatched size simply will not seal in any coupling.
Next, consider the copper type. Copper comes in M, L, and K grades. M copper has thinner walls, and L copper is thicker. For most indoor water supply extensions, either M or L works well. However, match the grade to your application. Buried lines and areas needing extra durability favor L copper.
Keep these selection tips in mind:
- Measure the outside diameter with a ruler or calipers.
- Choose rigid copper for straight, visible runs.
- Choose soft copper only where bends are unavoidable.
- Buy a section slightly longer than needed, then trim.
- Confirm the pipe is rated for your water temperature.
Length planning deserves a careful moment. Remember that each coupling consumes pipe at both ends. A four-inch extension with two couplings loses nearly two inches to the fittings. Therefore, add fitting depth to every measurement before cutting.
My laundry project taught me this the hard way. My first cut came up two inches short once fitting depth was counted. The hardware store trip was annoying, but cheap. Measure twice, cut once. That old saying exists for good reason.
How to Extend a Copper Pipe, Step by Step
Here is the complete push fit process from start to finish. This is the exact sequence I followed in my laundry room.
- Shut off the water supply and open a faucet to drain the line.
- Measure the gap and add fitting depths to find your pipe length.
- Cut the extension pipe square with a pipe cutter.
- Deburr both ends of the new pipe.
- Clean and check the existing pipe end for damage.
- Mark insertion depths on every pipe end.
- Push the coupling onto the existing pipe first.
- Push the new pipe into the other side of the coupling.
- Tug both joints gently to confirm they are locked.
- Restore water slowly and inspect every joint for leaks.
For longer extensions with a mid-run coupling, assemble on a flat surface first. Then install the whole assembly as one piece. This makes alignment far easier than joining pieces in midair.
Support matters on longer runs. Copper pipe needs a clip or hanger roughly every six feet horizontally. Support near each coupling keeps pipe weight off the joints. Additionally, leave slight room for natural expansion. Rigid pipe does not flex, so plan your route gently.
Finally, test patiently. Turn the water on slowly and watch each joint for a full minute. Then dry every connection with a tissue and check again after fifteen minutes. Slow weeps only reveal themselves after pressure sits on the seals. That short wait has saved me from two hidden drips already.
Common Mistakes to Avoid
Even simple extensions fail when done carelessly. Avoid these errors, and your new pipe run will last for decades.
Skipping pipe prep is the number one cause of leaks. Every method depends on clean, square pipe ends. Hacksaw cuts leave rough, angled edges that damage seals. Therefore, always use a proper cutter, then deburr and wipe.
Watch for these other frequent errors:
- Forgetting to add fitting depth to your measurements.
- Mixing pipe sizes between the old run and the new section.
- Not pushing pipe to the full depth mark on push fits.
- Over-tightening compression nuts until the ferrule crushes.
- Leaving long runs unsupported, which stresses the joints.
- Skipping the final leak check before closing anything up.
One more subtle trap deserves mention. Old pipe ends are often corroded or out of round. Pushing a fitting onto pitted copper invites a slow leak. Therefore, cut back until you reach clean, bright pipe. Those extra inches of cutting cost little and prevent big problems.
Conclusion
Extending copper pipe without solder is easier than most people imagine. Push-fit couplings finish the job in minutes with no tools, while compression couplings offer a cheap, time-tested alternative using basic wrenches. Press fittings deliver permanent, professional joints for bigger projects. Before extending a pipe, it’s also worth understanding how to choose between copper and plastic pipes in your home, especially when deciding whether copper is the right material for your project. Match your new pipe carefully, measure twice, and always test for leaks.
That too-short laundry pipe could have cost me a plumber’s visit. Instead, it became a forty-minute project and another skill in my toolkit. The extension has stayed dry through two years of daily use. Yours can too, with the right fitting and a little patience.
Now I want to hear from you. Have you extended a pipe in your home? Did you use push fits, or did you go old school with compression? Share your story in the comments below. Additionally, if this guide helped you, share it with a friend facing a short pipe. Your next plumbing project just got much simpler!
Frequently Asked Questions
What is the easiest way to extend a copper pipe?
A push fit coupling is the easiest. Cut the pipe square, clean it, mark the depth, and push both pipes into the coupling.
Can I extend copper pipe with PEX instead?
Yes. A push fit coupling can join copper on one side and PEX on the other. Just add a pipe insert to the PEX end.
Do I need to drain the pipe before extending it?
Yes. Always shut off the supply and drain the line first. Water pressure stops any coupling from sealing properly.
Are push fit extensions allowed inside walls?
Most brands are certified for behind-wall use, but local codes vary. Check with your building department before hiding any joint.
How do I measure the right length for a pipe extension?
Measure the gap, then add the insertion depth for each coupling. Half-inch fittings typically consume nearly one inch of pipe per end.